


Yes, you can!
Streamline Your Workflow: Gridding Contours Directly in Petrosys PRO Mapping
For Petrosys PRO users, working with contours is a fundamental task. But what if you could remove the need to keep switching modules and grid your data directly within Mapping? Well, with the introduction of Layer Gridding in Petrosys PRO 2023.2, that’s now a reality!
Say Goodbye to Module Switching:
Gone are the days of navigating between Surface Modeling and Mapping to complete the gridding process. Layer Gridding empowers you to perform everything within the familiar Mapping interface. This translates to significant time savings and a smoother workflow.
Effortless Gridding at Your Fingertips:
Here’s how Layer Gridding simplifies your workflow:
- Display Your Contours: As usual, navigate to Display > Contours… in Mapping to define how you want your contours to appear. Layer Gridding works seamlessly with both Petrosys contour files (*.con) and those displayed from Petrel and OpenWorks projects, offering great flexibility.
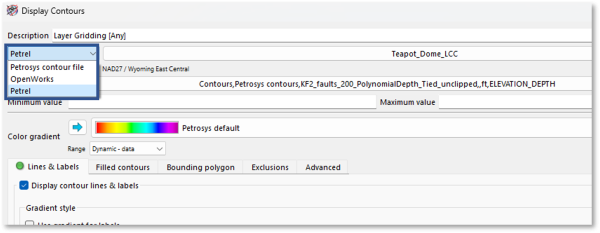
Pro Tip: Need to integrate data from Petrel or DSG? Leverage the drag-and-drop functionality in Mapping for a hassle-free import process. (Contact Petrosys Support for further details.)
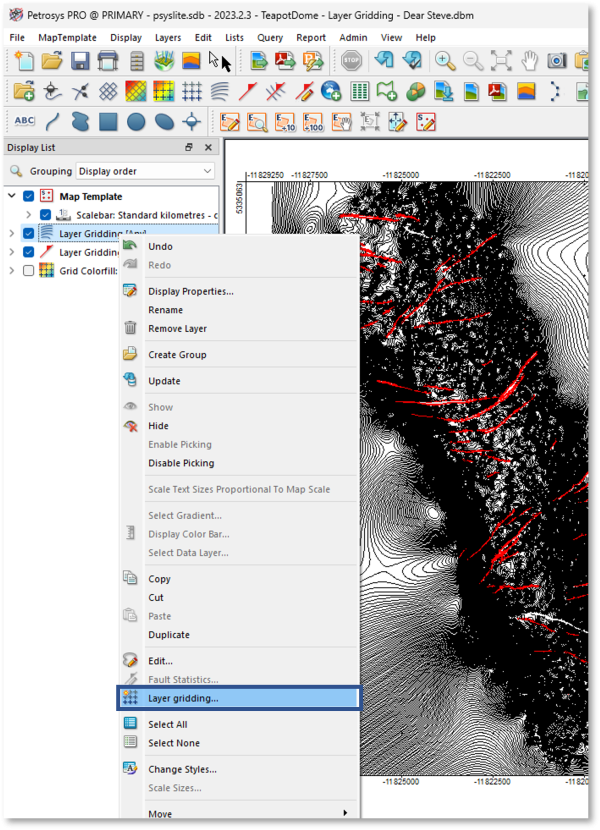
- Initiate Layer Gridding: Once your contours are displayed, simply right-click on the desired layer within the Display List and select “Layer Gridding…”.
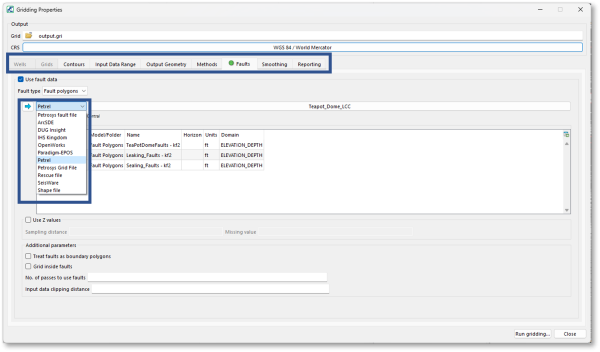
- Define Gridding Properties: This action opens the Gridding Properties panel. Experienced Surface Modeling users will find this interface familiar, as it provides a subset of those functionalities. You can define the output geometry and even incorporate fault data into the gridding process – just like the standard workflow.
Enhanced Flexibility:
Layer Gridding takes it a step further by allowing you to use fault data from third-party applications, maximizing your workflow options.
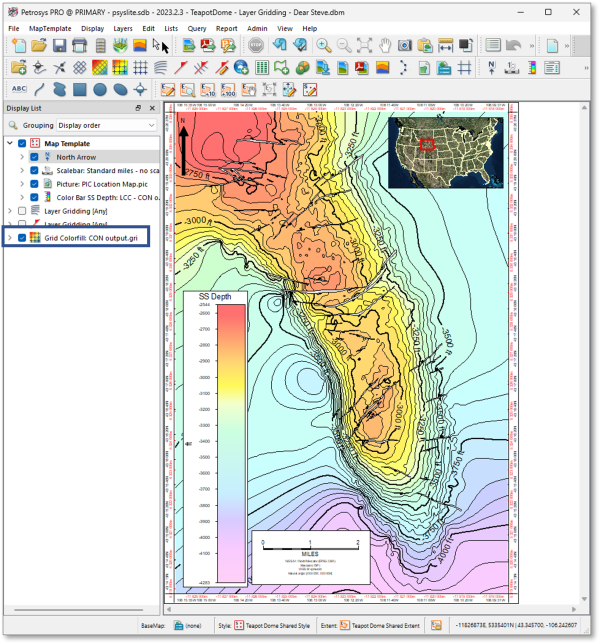
- Run the Gridding Process: After assigning a name to your output and adjusting any additional parameters, click “Run Gridding…” to initiate the process. Upon completion, the generated grid will be automatically added to your map’s Display List with default options.
- Finalize and Visualize: To complete the process, simply refine the display options and select a relevant Style Template. This streamlined workflow, all within a single interface, lets you create a new grid and a high-quality presentation map in record time!
Expand Your Knowledge:
Petrosys offers a wealth of resources to help you master Layer Gridding. Explore the comprehensive Petrosys Help system, or delve deeper with the workflows (PDF and video formats) available in the Client Portal.
Ready to experience the power of Layer Gridding? Upgrade to Petrosys PRO 2023.2 and streamline your data processing workflow!